
How to Remove Stickers from Your Car Without Damaging the Paint
Stickers on your car can be a fun way to express yourself, show off your favorite brands, or display important information like parking permits. However, there comes a time when you might want to remove stickers from car. Whether it’s because the sticker is faded, you’re selling the vehicle, or you simply want a cleaner look, the process needs to be done carefully to avoid damaging the paint. This comprehensive guide provides step-by-step instructions and expert tips on how to remove stickers from car effectively and safely.
Understanding the Challenge
Removing stickers from a car isn’t as simple as peeling them off. The adhesive used in these stickers is designed to be strong and durable, which means it can leave behind a sticky residue or, worse, damage the paint. The key is to soften the adhesive without harming the underlying surface. Different methods work better for different types of stickers and vehicle finishes, so it’s essential to understand the options available.
Essential Tools and Materials
Before you begin, gather the necessary tools and materials to make the process smoother and more efficient. Here’s a list of what you’ll need:
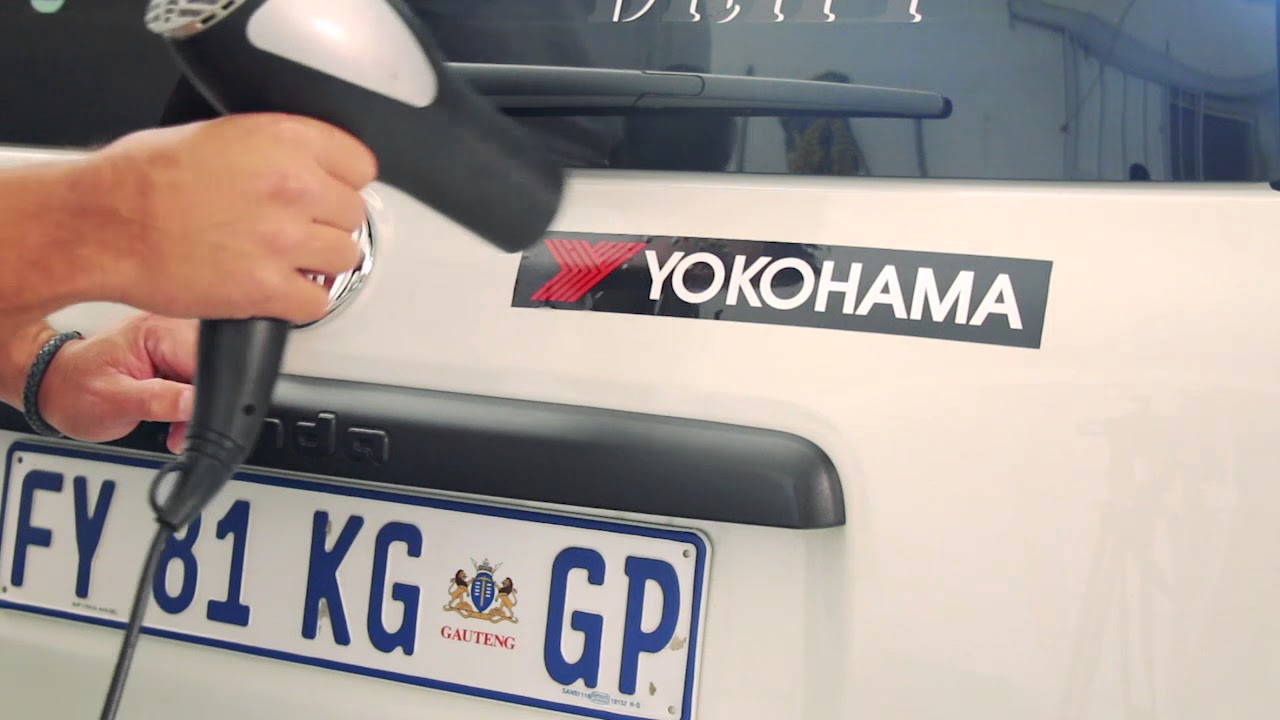
- Heat Gun or Hair Dryer: To soften the adhesive.
- Plastic Razor Blade or Scraper: For lifting the edges of the sticker without scratching the paint.
- Microfiber Towels: For wiping away residue and cleaning the surface.
- Adhesive Remover: Specifically designed for automotive use (e.g., Goo Gone Automotive, 3M Adhesive Remover).
- Isopropyl Alcohol (Rubbing Alcohol): For cleaning the area after removing the sticker and adhesive residue.
- Car Wash Soap and Water: For pre-cleaning the area.
- Wax or Polish: To protect the paint after the sticker is removed.
- Gloves: To protect your hands from chemicals.
Step-by-Step Guide to Removing Stickers
Step 1: Preparation
Begin by washing the area around the sticker with car wash soap and water. This removes any dirt, grime, or debris that could scratch the paint during the removal process. Rinse thoroughly and dry with a clean microfiber towel.
Step 2: Apply Heat
Use a heat gun or hair dryer to gently warm the sticker. Hold the heat source a few inches away from the sticker and move it back and forth to avoid overheating any one spot. The goal is to soften the adhesive, making it easier to peel away. Be careful not to overheat the paint, as this can cause damage. Generally, a minute or two of gentle heating should suffice.
Step 3: Lift the Edges
Using a plastic razor blade or scraper, carefully lift the edge of the sticker. Work slowly and gently, applying heat as needed to keep the adhesive soft. Avoid using metal blades, as they can easily scratch the paint. Once you have a small section lifted, try to peel the sticker back at a shallow angle, continuing to apply heat as you go.
Step 4: Remove the Sticker
Continue peeling the sticker slowly and steadily. If the sticker is large, work in small sections, applying heat and lifting the edges as you go. If the sticker tears, don’t worry; just continue working on the remaining pieces. The key is patience and persistence. The goal is to remove stickers from car in one piece if possible, but it’s okay if it comes off in smaller fragments.
Step 5: Remove Adhesive Residue
Once the sticker is removed, you’ll likely be left with some adhesive residue. Apply an automotive adhesive remover to the affected area. Follow the manufacturer’s instructions, as some removers need to sit for a few minutes before wiping away. Use a clean microfiber towel to gently rub the area until the residue is gone. For stubborn residue, you may need to repeat this step.
Step 6: Clean and Polish
After removing the adhesive residue, clean the area with isopropyl alcohol to remove any remaining traces of the adhesive remover. Then, wash the area again with car wash soap and water. Finally, apply a coat of wax or polish to protect the paint and restore its shine. This step is crucial to prevent damage and maintain the car’s appearance.
Alternative Methods and Tips
Using WD-40
WD-40 can be an effective alternative adhesive remover. Spray a small amount onto the sticker residue, let it sit for a few minutes, and then wipe it away with a clean cloth. Be sure to wash the area thoroughly afterward to remove any WD-40 residue.
Using a Magic Eraser
A Magic Eraser can also be used to gently scrub away sticker residue. Wet the eraser and gently rub the affected area. Be cautious, as Magic Erasers can be abrasive and may dull the paint if used too aggressively. Test in an inconspicuous area first.
For Older Stickers
Older stickers can be more challenging to remove because the adhesive has had more time to bond with the paint. In these cases, you may need to use a combination of heat, adhesive remover, and patience. Consider applying a plastic wrap soaked in adhesive remover over the sticker for an extended period to help soften the adhesive.
Preventing Damage
The most important thing is to avoid damaging the paint. Always use plastic tools instead of metal, and never apply too much heat or pressure. If you’re unsure about a particular method, test it in an inconspicuous area first. If you’re struggling to remove stickers from car, consider consulting a professional detailer.
Choosing the Right Adhesive Remover
Selecting the right adhesive remover is crucial for a successful sticker removal. Automotive-specific adhesive removers are designed to be safe for car paint and clear coat. Avoid using harsh chemicals or solvents that could damage the finish. Some popular and effective adhesive removers include:
- Goo Gone Automotive: A widely used and effective adhesive remover specifically formulated for cars.
- 3M Adhesive Remover: A professional-grade adhesive remover that works well on tough residues.
- Krud Kutter: A multi-purpose cleaner and adhesive remover that is safe for most surfaces.
Always follow the manufacturer’s instructions when using any adhesive remover, and test it in an inconspicuous area first to ensure it doesn’t damage the paint. Remember, the goal is to remove stickers from car without leaving any marks or damage.
When to Seek Professional Help
If you’re uncomfortable removing the sticker yourself or if you’re dealing with a particularly stubborn or large sticker, it may be best to seek professional help. Auto detailers have the tools, expertise, and experience to remove stickers from car safely and effectively. They can also repair any minor damage that may occur during the removal process.
Long-Term Care After Sticker Removal
After successfully removing the sticker and adhesive residue, it’s essential to take steps to protect the paint and prevent future issues. Here are some tips for long-term care:
- Apply a High-Quality Wax or Sealant: This will protect the paint from UV rays, oxidation, and other environmental factors.
- Regularly Wash and Detail Your Car: This will help maintain the paint’s shine and prevent dirt and grime from building up.
- Avoid Using Abrasive Cleaners or Tools: These can scratch or dull the paint.
The Importance of Patience
Removing stickers from your car requires patience and attention to detail. Rushing the process can lead to damage that is more costly and time-consuming to repair. By following these steps and using the right tools and materials, you can successfully remove stickers from car without harming the paint. Remember to work slowly, apply heat as needed, and always test any cleaning products in an inconspicuous area first. With a little effort, you can restore your car’s appearance and enjoy a clean, sticker-free finish. Taking your time will ensure you properly remove stickers from car and maintain its value and aesthetic appeal.
By following these detailed steps, you can confidently remove stickers from car and maintain its pristine condition. Remember to prioritize safety and patience throughout the process. Good luck!
[See also: How to Wash Your Car Like a Pro]
[See also: Best Car Waxes for a Showroom Shine]
[See also: Detailing Your Car Interior: A Step-by-Step Guide]
